FAQ Overview

How to re-download all available updates for Act4Work products?


  1. Launch the Act4Work Updater from either the Start menu or directly through file explorer.
    If you wish to know how to launch the updater, please see Article ID 1018
  2. As soon as the updater is launched, press and hold the Shift key on your keyboard.
  3. Once the program finishes scanning, it should now display available updates for all installed Act4Work products. If you do not see any available updates, it is likely you did not press and hold the Shift key quick enough. Perofrming the above steps correctly will always display available updates. Please try the above steps again if you do not see any available updates.


2026-07-15 05:11
Admin

How to retrieve the Act! Web API URL when using Act! Connect Link

If you are trying to connect to an application that requires an Act! Web API URL but you do not possess an SSL certificate, you may use the Act! Connect Link instead. After installing Act! Connect Link on the machine hosting the database, please follow the steps below to retreive the URL

  1. Click Start > All Programs > Act! Connect Link > Act! Connect Link to start the application


  2. Once the Act! Connect Link window is opened, click the Manage link.


  3. Copy the URL from the Endpoint field which is unique to your machine.


  4. Once you copy the Endpoint URL, simply append /act.web.api to the end of the URL to create the Act! Web API URL. For Example,  https://xxxxx.g2c.cloud-elements.com/act.web.api 
  5. You can now enter this URL into the application settings that needs to connect to the Act! database.

2026-07-15 05:11
Admin

Setting up auto restart Act! Web API

Since the Act! Web API is a 32 bit application, when the process reaches around 2 gigs of RAM, it needs to be restarted. To configure automatic restarts of this process, please follow the steps below:

  1. Open Microsoft IIS
  2. Click Application Pools in the Connections section, and highlight the act.web.api application pool. Once highlighted, click the Advanced Settings link on the right hand side.


  3. Scroll down to the Private Memory Limit (KB) section, and enter 2000000 as the valie and press OK. The Act! Web API process should now be restarted once the process reaches 2 gigs of RAM usage.

2026-07-15 05:11
Admin

Emails messages are not attached to Act! automatically

If Act4Outlook is enabled, activated, fully configured, and Email messages are still not attaching properly to the Act! database, it may be because of one or more of the following conditions.  


Email Address not entered in Act

In order for automatic history recording to work, your email address must be entered in an email field in Act such as E-mail, Personal Email etc. If you have multiple email address that you send from in Outlook, they all must be entered on your Act Contact record. To verify this, please log in to Act! and press the menu Lookup > My Record. Ensure your email addresses are entered in email fields. If not, please enter them, save the record, and try again. Note: The field type of the field in Act! must be E-Mail. Using regular Character fields is not supported

Emails send to Act! users without enabling the Act4Outlook Setting

If you send an email to a Contact that is also an Act! user, emails sent to this Contact will not attach by default.  For example, if you send an email to yourself or a co-worker who also uses Act, the emails will not be attached. If you are sending these emails for the purpose of testing, send the email to another Contact that is not a user. To allow emails sent to users to be attached, follow the steps below:

  1.  Click the Act4Outlook Settings button on the Home tab of Outlook.
  2.  Click the History Recording tab, and enable the Attach emails to Act! database users option. 
  3. Click  Save and Close and restart Outlook.


Restart Outlook

After initial setup, or changing any settings, you must remember to restart Outlook otherwise these settings will not apply and cause issues with history recording. If you are having issues with history recording, simply restart Outlook first and see if that fixes the issue. If not, please continue with the article below.

Incorrect database set in Act4Outlook Settings

Click the Act4Outlook Settings button and ensure the correct database path is set up. If you have recently switched databases, it will be necessary to update the database location in Act4Outlook as well.


Messages not saved to Outlook Sent folder

In order for emails to attach to Act! once the user presses the Send button, the emails must be saved to the Sent Items folder in Outlook. If Outlook settings are set to not save copies of sent items, it could cause issues with Act4Outlook history recording. Please follow the steps below to ensure this option is not enabled.

  • Click File > Account Settings. Open up the Advanced settings of the affected email account.
  • Under the Advanced tab, ensure the Do not save copies of sent items is unchecked.
  • Restart Outlook and send a test email to verify emails are now recorded properly.


Email Account Excluded

If user accidently excluded the email account from automatic history recording, this will prevent emails from being recorded automatically. Please ensure the email is not checked in the Excluded Outlook Accounts section of Act4Outlook settings as shown below: 

2026-07-15 05:11
Admin

How do I set up Act4CASL?

In order to use Act4CASL, a custom field and dropdown menu must be created. This operation can only be performed on the machine hosting the database.

If you are hosting the Act! database on your own machine, please install Act4CASL on your computer and proceed to the Initial Setup section below. If your Act! database is hosted on a different computer such as a server, or shared PC, then you will need to perform the Initial Setup on that machine instead. If your database is hosted by a third party hosting company, please contact your hosting provider so they can assist you with the import. Once the steps in the Initial Setup section have been performed, you may move on to the Configuration section.

Note: Please create a backup of your database prior to begining with the initial setup section.

Initial Setup

  • Install Act4CASL on the machine hosting the database and log in.
  • After logging in, you will be presented with the Act4CASL activation window. Enter your license key, or press Close to continue in trial mode.
  • If logged in as an Administrator, you will be prompted to create a custom field. Click Yes to lock the database and create the field automatically.


  • Once the field is created, please add the "CASL Permission" field to your Contact layout. To learn more about adding fields to your layout, please refer to the following article: Article ID: 1011

Configuration and Sending Emails

  • Once logged in to the database, create a lookup of Contacts whom you wish to send the CASL permission email to.
  • Click the menu Act4CASL > Send Emails To Lookup


  • Click the Configure Act4CASL button.


  • In the Account ID field, enter your account ID. This ID can be retrieved by creating an account on www.act4casl.com. Click the Create Account link to visit the act4casl website.
  • Once registered and logged in, click the ACT4CASL Webpage Settings link near the top of the page.


  • On this page, you can enter your company name, URL, and a custom message that your Contacts will see once they click on the unique link sent by Act4CASL. You can also upload a company logo. Copy and paste the Account ID  in the Act4CASL act plugin.


  • In the Send Email As section, enter your SMTP mail server settings. Since you will likely be sending our hundreds of emails, it is recomended that you sign up for a email service, such as www.sendgrid.com 

    If you wish to use your internal email server settings, please contact your email provider/IT Administrator and they should be able to assist you with entering the correct settings.
  • Once all fields are populated, click the Save button.


  • Enter an Email Subject and Signature which will be used to send the email to your contacts. Click the Refresh Preview button to preview the email message.


  • If you wish to change the content of the email, you may click the Edit Template button, which will open up the email template for editing.

  • Your email template will open up in notepad. If you wish to include any Contact fields in the template, please enclose the field name in angled brackets <>.
    See highlighted sample below for an example for the Contact name field.

  • After making the necessary changes, save and close the notepad file and click the Refresh Preview button to confirm the changes were saved successfully.
  • Once satisfied with the template, click the Send Emails button. On the following popup, select whether you wish to send emails to the current contact, current contact lookup, or all contacts in your database. For testing, it is recommended that you lookup your own Contact record by clicking the menu Lookup > My Record and then selecting the Current Contact option. Once satisfied, you can send the email to the rest of your Contacts. Each contact will be sent a unique link which they can click to indicated if they wish to be contacted or not.
  • If you need to retrieve the unique link for a particular Contact click the menu Act4CASL > Generate Unique Link


  • After clicking this menu option, the unique CASL consent link for that Contact will be copied to your clipboard. You may now past this in an email and send it to the Contact manually.

Updating Contact Permissions

  • Once you have sent emails to your contacts, it is recommended to Update your database occasionally and download their choices.
  • Click the menu Act4CASL > Update CASL Contacts.


  • All contact responses will be downloaded one by one. The CASL Permission field will be updated to reflect their choices and a history record will also be created for each contact.

2026-07-15 05:11
Admin

Sending Opt-in Request Emails

  1. Click the menu OptinManagerWeb > Email Blasts > Send Emails


  2. For initial testing, it is highly recommended to pick the Selected Contacts option, and sending a test email to your own Contact record. If the tests are successful, you can send emails to multiple Contacts in the database using the other options.

    If you would like to send emails to anyone in the database who has not provided their permission yet, select the Contacts with blank vaues in the "Email Permission" field option.

    If you would like to send emails to Contacts in a group, select the Contacts in a Group option and select a group from the dropdown.

    If you would like to send the emails to all Contacts in the database, select the All Contacts option. 
  3. Press Next to continue.


  4. If selecting Contacts manually, enter the name, email, or company name in the search bar and press Enter to filter your results. Press the > or < buttons to add/remove contacts from your selection. Press Next to continue.


  5. Confirm your selection before proceeding. Press Next to being sending emails.
  6. Once sent, press Finish to close the wizard.


2026-07-15 05:11
Admin

Updating Contact Permissions with OptinManagerWeb

  1. Once Opt-in request emails have been sent, you can run use OptinmanagerWeb to download the Contact's choices to your Act! database. It is recommended to run this process at least once a week to ensure your database stays up to date. Once the permissions are downloaded, they are removed from the OptinManagement.com servers.
  2. Click the menu OptinManagerWeb > Update Contacts


  3. OptinManagerWeb will now download the Contact choices and save the values in the Email Permission field for each Contact.

2026-07-15 05:11
Admin

Verify Email List Using BriteVerify Integration In OptinManagerWeb

  1. Once you have entered your BriteVerify credentials in the OptinManagerWeb Settings, click the menu OptinManagerWeb > Email List Verification > Verify using Briteverify


  2. For initial testing, it is highly recommended to pick the Selected Contacts option, and verifying the email adress of your own Contact record. If the tests are successful, you can verify multiple Contacts in the database using the other options below.

    If you would like to verify the emails of Contacts who have not been verified yet, select the Contacts with blank vaues in the "Email Permission" field option. 

    If you would like to verify Contacts in a group, select the Contacts in a Group option and select a group from the dropdown.

    If you would like to verify the emails of all Contacts in the database, select the All Contacts option.


  3. If selecting Contacts manually, enter the name, email, or company name in the search bar and press Enter to filter your results. Press the or < buttons to add/remove contacts from your selection. Press Next to continue.


  4. Confirm your selection before proceeding. Press Next to being verifying the emails.
  5. Once completed, press Finish to close the wizard.

2026-07-15 05:11
Admin

Activation is lost once the user logs off from the machine.

If any Act4Work application loses it's activation information after the user logs off from their profile, it is possible that the required registry keys are not preserved due to certain group policies.

In order for the applications to remain activated, the data in the following keys and their subkeys, needs to be preserved:

  • HKEY_CURRENT_USER\Software\Classes\CLSID\
  • HKEY_LOCAL_MACHINE\Software\Classes\CLSID\
  • HKEY_CURRENT_USER\Software\Wow6432Node\Classes\CLSID\
  • HKEY_LOCAL_MACHINE\Software\Wow6432Node\Classes\CLSID\

2026-07-15 05:11
Admin

What’s new is Knowtifier version 1.5.4?

Upgrading from Knowtifier 1.4

  • Install the latest version of Knowtifier. Once installed, copy the "config.json" file from the old Knowtifier install location to the new one. In previous versions, the default location of Knowtifier is C:\Knowtifier.  Copy the config.json file to C:\Program Files (x86)\Act4Work\Knowtifier
  • Start up the upgraded Knowtifier,  and log in to the database.
  • Click the "Settings" button, and click "Uninstall" to remove the old Knowtifier service.
  • Once uninstalled, click the "Install" button to use the new Knowtifier service.
  • Click "Start" to start the new service.


Knowtifier New Features

Enhanced Filtering
• Users can now filter records much more easily with the enhanced filter editor.
• Editor can now combine And/Or conditions.
• Editor can now combine filters from different tables such as Contact and Custom Tables.
• Editor can now use brackets to create more complex queries.


Enhanced Notice Management
• Users can now enable or disable selected notices from the main menu easily.


Field Change Triggers
• Knowtifier can now trigger emails based on field changes.
• Fields can be any Contact, Opportunity, or Custom Table fields.
• Knowtifier will check for field changes once every 15 minutes


Activity Notices
• A new notice type of “Activity Notice” is now available which is triggered by activities in the Act! database.
• Users may create customizable templates with the ability to pick from several Activity related fields
• Ability to pick specific users and activity types for notices.
• Trigger email based on activity alarm or a certain time before the activity start time
• Send emails to associated User who the call is scheduled for, Contacts the activity is scheduled with, or all of the above.


Remote Database Sync Notices
• A new notice type of “Remote Database Sync Notice” is now available which is triggered by the last sync dates of the remote databases in the company.
• Users can specify the number of days a RDB can go without syncing and if it does, an automated email can be sent to the email address set in the remote database notice.


Reporting4Act Notices (Requires Reporting4Act to be installed)
• A new notice type of “Reporting4Act Notice” is now available which is triggered similarly to a regular Email Notice. However, instead of sending a templated email, a Reporting4Act report is attached as a PDF to the email and sent to the Contact.
• Once the Reporting4Act reports folder is set, user may pick a report to be sent out to the Contact.


2026-07-15 05:11
Admin

Recording sent emails to Act! automatically

  1. If Act4OutlookWeb is configured correctly as discussed in the  How to setup Act4OutlookWeb article, simply sending an email regularly will record the email in Act if the Contact exists in Act. 
  2. If you do not wish to record a particular email to Act as it is being sent, please click the Send without attaching button


  3. If you would like to record the email to a specific Contact not included in the email, or another entity such as a Company, Group, or Opportunity, click the Send and link button and select the records you wish to attach the message to.

2026-07-15 05:11
Admin

&quot;Invalid column name&quot; error when viewing a custom table list view

If you receive an error similar to "Invalid column name TableName_XXXXID" when viewing a custom table in list view, it will be required to rebuild the database's Oledb views manually. This is due to a defect in Act! versions 25 and older therefore, this error may appear in these versions at a higher frequency especially if new tables or fields are added or updated. To rebuild the oledb views, follow the steps described in this article: https://kb.act4work.com/index.php?solution_id=1094 

2026-07-15 05:11
Admin

How to setup QSales for Act

In order to use QSales for Act v13, the QSales API needs to  be installed on a server running a Windows Server or Windows Professional operating system which also has local or LAN access to the Quickbooks company file.  In a shared network environment, the QSales API only needs to be installed on this central machine and not on every workstation. The QSales API will communicate with Quickbooks and return data to the Act users running the QSales for Act plugin.

If QSales v13 has not been setup in your environment previously, please first proceed to the Installing the QSales API section first, and then finally, setup and configure the QSales for Act plugin using the links below

Note: Prior to continuing with installation, please ensure your Quickbooks Desktop software is fully up to date. Otherwise,  QSales may potentially have issues connecting with your data file. Once updated, it is also highly recommended to reboot the machine. Once this is done, you may continue with this guide.

2026-07-15 05:11
Admin

Act4CASL

Go to category

How do I set up Act4CASL?

In order to use Act4CASL, a custom field and dropdown menu must be created. This operation can only be performed on the machine hosting the database.

If you are hosting the Act! database on your own machine, please install Act4CASL on your computer and proceed to the Initial Setup section below. If your Act! database is hosted on a different computer such as a server, or shared PC, then you will need to perform the Initial Setup on that machine instead. If your database is hosted by a third party hosting company, please contact your hosting provider so they can assist you with the import. Once the steps in the Initial Setup section have been performed, you may move on to the Configuration section.

Note: Please create a backup of your database prior to begining with the initial setup section.

Initial Setup

  • Install Act4CASL on the machine hosting the database and log in.
  • After logging in, you will be presented with the Act4CASL activation window. Enter your license key, or press Close to continue in trial mode.
  • If logged in as an Administrator, you will be prompted to create a custom field. Click Yes to lock the database and create the field automatically.


  • Once the field is created, please add the "CASL Permission" field to your Contact layout. To learn more about adding fields to your layout, please refer to the following article: Article ID: 1011

Configuration and Sending Emails

  • Once logged in to the database, create a lookup of Contacts whom you wish to send the CASL permission email to.
  • Click the menu Act4CASL > Send Emails To Lookup


  • Click the Configure Act4CASL button.


  • In the Account ID field, enter your account ID. This ID can be retrieved by creating an account on www.act4casl.com. Click the Create Account link to visit the act4casl website.
  • Once registered and logged in, click the ACT4CASL Webpage Settings link near the top of the page.


  • On this page, you can enter your company name, URL, and a custom message that your Contacts will see once they click on the unique link sent by Act4CASL. You can also upload a company logo. Copy and paste the Account ID  in the Act4CASL act plugin.


  • In the Send Email As section, enter your SMTP mail server settings. Since you will likely be sending our hundreds of emails, it is recomended that you sign up for a email service, such as www.sendgrid.com 

    If you wish to use your internal email server settings, please contact your email provider/IT Administrator and they should be able to assist you with entering the correct settings.
  • Once all fields are populated, click the Save button.


  • Enter an Email Subject and Signature which will be used to send the email to your contacts. Click the Refresh Preview button to preview the email message.


  • If you wish to change the content of the email, you may click the Edit Template button, which will open up the email template for editing.

  • Your email template will open up in notepad. If you wish to include any Contact fields in the template, please enclose the field name in angled brackets <>.
    See highlighted sample below for an example for the Contact name field.

  • After making the necessary changes, save and close the notepad file and click the Refresh Preview button to confirm the changes were saved successfully.
  • Once satisfied with the template, click the Send Emails button. On the following popup, select whether you wish to send emails to the current contact, current contact lookup, or all contacts in your database. For testing, it is recommended that you lookup your own Contact record by clicking the menu Lookup > My Record and then selecting the Current Contact option. Once satisfied, you can send the email to the rest of your Contacts. Each contact will be sent a unique link which they can click to indicated if they wish to be contacted or not.
  • If you need to retrieve the unique link for a particular Contact click the menu Act4CASL > Generate Unique Link


  • After clicking this menu option, the unique CASL consent link for that Contact will be copied to your clipboard. You may now past this in an email and send it to the Contact manually.

Updating Contact Permissions

  • Once you have sent emails to your contacts, it is recommended to Update your database occasionally and download their choices.
  • Click the menu Act4CASL > Update CASL Contacts.


  • All contact responses will be downloaded one by one. The CASL Permission field will be updated to reflect their choices and a history record will also be created for each contact.

2026-07-15 05:11
Admin

Act4Mail

Go to category

How to setup Act4Mail

Installation

  1. Please note that the latest Act! Web API (version 1.0.409.0 or higher) must be installed on a server which has direct access to the Act! database before you attempt to use Act4Mail on your local desktop. You can download the latest API from Act website at www.act.com/downloads.

    If your Act database is hosted with a Act Hosting provider, they can provide you with this URL. If your main Act! database is hosted locally, your Act! Administrator can provide this address. The Act Web API URL is usually in the format https://yourserverhostname.com/act.web.api 
    Note that HTTPS is required for Act! Web API to function. 

  2. The User that will be accessing Act4Mail must also be given the Web API Access permission in Act! Please click Tools > Manage Users in Act, and verify that this permission has been granted to the user otherwise they will not be able to log in to the database.
  3. If you do not posses an SSL certificate in order to enable HTTPS, you may use Act! Connect Link instead. More instructions can be found here
  4. Download the Act4Mail setup file to your desktop or download directory. The location has to be easily accessible to you.
  5. Close any open instances of Outlook.
  6. If installing on a standalone desktop PC or server, simply double-click on the Act4Mail setup file to initiate the installation process.  If you are installing Act4Mail on a RDS/Terminal server, please set the server in install mode prior to running the setup file. More info can be found here
  7. Once installed, the Act4WorkUpdater will be launched automatically. It is highligly recommended to install any available updates. 

Configuration

  1. After completing the installation, launch Outlook. Once it is loaded, click on File from the top pull down menu, and then Account Settings. You'll be prompted to click on Account Settings again before the settings screen displays.

2026-07-15 15:52
Admin

How to setup Act4OutlookWeb APFW Plugin

In order for Act4OutlookWeb "Go To Contact" feature to function, the Act4OutlookWeb APFW files must be installed on the server that is publishing the Act For Web database. The Act4OutlookWeb APFW Files Installer can be found at the following downloaded link: http://act4work.com/files/act4outlookwebapi/Act4OutlookWebAPI.exe


APFW Files Installation

  1. Launch the Act4Outlook Web API installer. Click the Install APFW Files button to install the Web API.


  2. Select the location of Act's APFW folder if you are using a custom APFW folder. If not, leave the default path and click the Install button to install the APFW files.   

2026-07-15 06:08
Admin

Creating Contact from Act4OutlookWeb

  1. Right click on an email and click  Create Contact in Act! 


  2. By default, the Contact name and email should be prepopulated. If you would like to add/remove any default fields, click the Settings button, which should allow you to add/remove any Contact fields.

2026-07-15 15:20
Admin

Create Activity from Act4OutlookWeb

  1. Right click on an email and click Create Activity in Act!


  2. In the Create Activity window, enter the Date/Time and other details of the activity similar to how you would enter the activity in Act! The body of the email  will be placed in the Details tab by default, and the Regarding will be set to the current email's subject.
  3. In the Entity Links section, click the appropriate buttons to link the activity to any Contact, Company, Group, or Opportunity. If you would like to quickly link the activity to your own Contact, click the Link to my Contact button.

2026-07-15 15:22
Admin

Act4Mortgages

Go to category

How do i install Act4Mortgages?

In order to use Act4Mortgages, certain fields and custom tables must be created. This will be referred to as the "Schema Import" in this article. This operation can only be performed on the machine hosting the database.

If you are hosting the Act! database on your own machine, please proceed to the schema import section. If your Act! database is hosted on a different computer such as a server, or shared PC, then you will need to perform the initial schema import on that machine instead. If your database is hosted by a third party hosting company, please contact your hosting provider so they can assist you with the import.

Schema Import

  1. After installing Act4Mortgages and Topline Designer using the installer provided, please start up Act.
  2. Enter your Act4Mortgages and Topline Designer serial number to activate the products.
  3. Click on the menu Act 4 Mortgages > Install Act 4 Mortgages


  4. Proceed through the wizard and when prompted, make sure Act4Mortgages Schema is selected.

2026-07-15 15:18
Admin

Act4Outlook

Go to category

How do I set up Act4Outlook?

Installation

  1. Download the Act4outlook setup file to your desktop or download directory. The location has to be easily accessible to you.
  2. Close Act! And Outlook.
  3. Double-click on the Act4outlook setup file to initiate the installation process. If you have User Access Control enabled, you will receive a security prompt to confirm the installation. Some Anti-Virus programs may attempt to intercept the installation of Act4outlook application. If yours is one of them, please disable the Anti-Virus program or disable it's real-time scannning, and then resume the installation of Act4outlook.
  4. As you attempt to download the installer, you may get a download security warning from Microsoft saying the program may be unsafe to run. Proceed with the download anyway, taking care to download first instead of trying to run from the download link.
  5. Once the download is complete, Microsoft may display addition warnings. Click Actions, and then More Options, and Run Anyway. These warnings may or may not appear based on the security settings of your computer or network.
  6. You will receive a welcome screen for the Act4outlook setup program, and select Next
  7. The next screen will display a window with the a checkbox beside the installation package it intends to deploy. Click Next again.
  8. The next window will display the default folder destination for the Act4outlook program files is C:\Act4outlook. You can change this during the installation process, but the default is recommended. It is strongly advisable not to install the program files into your Profile, namely C:\USERS\YourName as profile security settings could interfere with the running of Act4outlook. Click Next.
  9. The final screen will prompt you to click Finish, and you're done.  


Configuration

  1. After completing the installation, launch Outlook. Once it is loaded, click on File from the top pull down menu, and then Account Settings. You'll be prompted to click on Account Settings again before the settings screen displays.

2026-07-15 15:22
Admin

Troubleshooting issues with Act4Outlook addin not loading in Outlook

This article covers a number of scenarios which might cause the Act4Outlook addin to not load properly.


64-Bit Office

Act4Outlook will not function if you are using 64-bit office as it is only compatible with 32-bit Offce installations. To verify the version, please follow the steps below:

  • Click the File Menu
  • Click Office Account
  • Click About Outlook
  • In the About Outlook window, the version of Office should be display at the top of the window as highlighted below. If you are using 64-bit Office, please contact your IT department and they should be able to assist you in installing 32-bit Office instead. Note: Act! might need to be reinstalled if Office is uninstalled.


2026-07-15 15:27
Admin

How do I register my Act4Outlook installation?

  • From the Home tab of Outlook, click Act4Outlook Settings

2026-07-15 15:28
Admin

&#34;Object Reference&#34; error when clicking Act4Outlook Settings Button

If you receive the following error when clicking the Act4Outlook Settings button, follow the steps below.


Issue with Exchange Account

  • If you are using an Exchange account and recieve this error,  it is possible that there is an issue with the Outlook profile. You can either turn off "Cached Mode" for the affected account, or create a new Outlook profile.
  • To disable cahced mode, click File > Account Settings > Account Settings

2026-07-15 15:44
Admin

&#34;Error while validating license. Details: The type initializer for ’Act4Outlook.Lic.QLicenseManager’ threw an exception&#34; when opening Outlook

You may receive the following error when opening Outlook:

2026-07-15 15:48
Admin

The type initializer for ’Act4Outlook.ActEngine.ActProcessor’ threw an exception


If you receive the attached error when starting up Outlook, it could be because of the following known reasons:

64 bit Office

If Act4Outlook version 5 or lower is installed on an environment with 64 bit Office, then this error can be displayed at startup. Act4Outlook 5 or lower is only supported when being used with 32 bit Office.


Corrupt Act Installation

If the above scenario does not apply, this error could be caused by corrupt Act installation as well. In this case, it is recommended to first uninstall Act, reboot the computer, then reinstall Act which should fix this error.

2026-07-15 15:49
Admin

&#34;Exception from HRESULT: 0x8004010F&#34; error when sending/receiving email in Act4Outlook


If you receive the above error "Exception from HRESULT: 0x8004010F" error when sending/receiving email in Act4Outlook, your Outlook profile may be corrupt and need to be re-created. Please see the following article by Microsoft which covers this error in more detail: https://support.microsoft.com/en-ca/help/2659085/error-0x8004010f-when-you-try-to-send-or-receive-email-in-outlook-2010

2026-07-15 15:49
Admin

Could not load file or assembly ’SautinSoft.Document’ error when using Act4Outlook

2026-07-15 15:50
Admin

Go to Contact not working in Act4Outlook

If Go To Contact is not working correctly in Act4Outlook, it could be because either Act! is not running, or the Act4Outlook Act! addin is not installed, or enabled. If Act! is not running, please log in to Act! fully before attempting to run the Go To Contact function. 

To ensure the plugin is enabled, please open Act! and press the menu Tools > Manage Add-ons

In the list, please ensure Act4Outlook.Server is enabled.

2026-07-15 15:51
Admin

Go to Contact in Act For Web from an email

You can navigate to the Contact in Act For Web by either right clicking the email message and clicking Go To Contact, or double clicking the email message and clicking Go To Contact button from the top left of the screen. 

Note that this feature requires the Act4Outlook APFW files to be installed on the server. Please refer to the Act4OutlookWeb API Installation instructions article for more details.


2026-07-15 15:17
Admin

Recording sent emails to Act! automatically

  1. If Act4OutlookWeb is configured correctly as discussed in the  How to setup Act4OutlookWeb article, simply sending an email regularly will record the email in Act if the Contact exists in Act. 
  2. If you do not wish to record a particular email to Act as it is being sent, please click the Send without attaching button


  3. If you would like to record the email to a specific Contact not included in the email, or another entity such as a Company, Group, or Opportunity, click the Send and link button and select the records you wish to attach the message to.

2026-07-15 05:11
Admin

Recording emails to Act! manually

Quick attaching an email to Act!

  1. Right click on one or more emails in Outlook and click Quick attach Email to Act!


  2. If you sent the message yourself, Act4OutlookWeb will use the recipeient's email addresses to find and link the Contacts to the history. If the message's sender does not match your email address in Act, Act4OutlookWeb will use the sender's email address to find and link the Contact to history. If the Contact is not found in Act, you will see the Create Contact popup as shown below. You can then either create the Contact, skip the Contact, or skip creation of all Contacts in the current batch by clicking the appropriate buttons below.

2026-07-15 15:19
Admin

Act4Realty

Go to category

How do I setup Act4Realty?

In order to use Act4Realty, certain fields and custom tables must be created. This will be referred to as the "Schema Import" in this article. This operation can only be performed on the machine hosting the database.

If you are hosting the Act! database on your own machine, please proceed to the schema import section. If your Act! database is hosted on a different computer such as a server, or shared PC, then you will need to perform the initial schema import on that machine instead. If your database is hosted by a third party hosting company, please contact your hosting provider so they can assist you with the import.

Schema Import

  1. After installing Act4Realty and Topline Designer using the installer provided, please start up Act.
  2. Enter your Act4Realty and Topline Designer serial number to activate the products.
  3. Click on the menu Act4Realty > Setup Act4Realty


  4. Proceed through the wizard and when prompted, make sure all items are selected. If you do not wish to import all items, please ensure that at minimum, Act4Realty Schema/Layouts is selected. 

2026-07-15 15:20
Admin

Act4Wealth

Go to category

How do I set up Act4Wealth?

After installing Act4Wealth, Launch Act!.  You will see the following screen:

  1.  Enter the Activation Key
    1. Click Activate 
    2. Click Close

2026-07-15 05:38
Admin

General Knowledgebase Articles

Go to category

Unable set up a Gmail account in an Act4 Product

If you are unable to use a Gmail account in the Email settings section of any Act4 Products, then you will need to enable 2factor authentication on your Gmail account, and use an App Password instead of your regular account password. Instructions on setting up an app password can be found here: https://support.google.com/accounts/answer/185833?hl=en#zippy= 

When generating an app password, please pick Mail and Other (Custom name) as shown below.

2026-07-15 05:37
Admin

The Act4 product is not working as intended

If your Act4 product is not working as intended, or you see missing DLL errors, please ensure that your antivirus software is not interfering with the installation or use of the software. Due to the differences between all antivirus softwares, exact steps on adding your Act4 product to the antivirus software cannot be provided. Please contact your IT Administrator, or antivirus vendor for detailed instructions on how to disable the antivirus, or add exceptions.

Identifying If Antivirus Is Blocking Act4 Proucts

The easiest way to identify if you antivirus is causing issues is to simply disable the antivirus temporarily. Once disabled, reinstall the application and verify if the application is now working as intended. If the application is working correctly, re-enable the antivirus, and add the installation directory to the antivirus exceptions. 

Adding Installation Folders To Exceptions

Most Act4 products run as Act! plugins and therefore, have certain components installed in the Act plugins directory. By default, this folder should be one of the folders listed below based on if you machine is 32-bit or 64-bit:

32-bit Folder:     C:\Program Files\ACT\Act for Windows\Plugins
64-bitFolder:      C:\Program Files (x86)\ACT\Act for Windows\Plugins

Ensure the plugins folder is added to your antivirus exceptions.

In addition to the Act! plugins folder, certain Act4 products are installed in different locations. These folders will also need to be whitelisted. These folders are listed below:

Act4Outlook:  
C:\Act4Outlook

Knowtifier:
C:\Knowtifier

If your product was not installed in the default location, please pick the correct folder where the application resides.

2026-07-15 06:08
Admin

How do I find my Act! database PAD file?

To find your database PAD file, please follow the steps below:

  1. Log in to your Act! database.
  2. Click on the menu Help > About Act

2026-07-15 15:16
Admin

How do I force Act! to reload plugins that previously failed to load?

In cases where an Act plugin is not loaded correctly either due to missing dependencies or other issues, it may be necessary to force Act to reload all available plugins. Please follow the steps below in order to accomplish this.

  1. Close Act! if it is already running.
  2. Open the Windows Run window, by pressing and holding the Windows Key on your keyboard and pressing "R" (Win + R). Alternatively, you may also press the Start menu, and type Run in  the search menu. From the list, select the Run program.

2026-07-15 15:18
Admin

How do i add a field to the Contact layout?

The Act Contact layout can be modified by users with roles of "Manager" or "Administrator". To add a field to the Contact layout, follow the steps below:

  1. Click the menu Tools > Design Layouts > Contact. This will open up the layout editor and your current layout will be made available for editing. 

2026-07-15 15:19
Admin

How to re-download all available updates for Act4Work products?


  1. Launch the Act4Work Updater from either the Start menu or directly through file explorer.
    If you wish to know how to launch the updater, please see Article ID 1018
  2. As soon as the updater is launched, press and hold the Shift key on your keyboard.
  3. Once the program finishes scanning, it should now display available updates for all installed Act4Work products. If you do not see any available updates, it is likely you did not press and hold the Shift key quick enough. Perofrming the above steps correctly will always display available updates. Please try the above steps again if you do not see any available updates.


2026-07-15 05:11
Admin

Act.Framework.CumulativeUserCountException error when logging into Act database using an Act4Work product.

2026-07-15 15:26
Admin

Unable to connect to the remote server error when attempting to activate or update an act4work product

If you receive an unable to connect to the remote server error when attempting to activate or update an act4work product, it is likely that your local or network firewall may be blocking connections to our activation server. In order to verify if you are able to reach the activation server, please open up a web browser, and try to navigate to the URLs below: 

https://activation.act4work.com/
http://updates.act4work.com/
http://updates.apps4act.com/

 If you are not able to reach the above URLs, please work with your IT deparment to add the above URLs to your antivirus or firewall exceptions.

2026-07-15 15:28
Admin

Installing Software on a Terminal Server

In order to install software on a terminal server which will be shared by multiple users, it is required that the server be put in install mode. To do this, follow the steps below.

  1. Press the Windows Start button and in the search bar, type cmd
  2. Right click CMD.exe and click Run As Administrator in order to launch an elevated command prompt.


  3. In the command prompt, type the following line and press Enter to put the server in install mode:
    change user /install

  4. Run the installer for the software as normal while the server is in install mode. 
  5. Once installation is completed, put serer back in execute mode by typing the following line and pressing Enter:
    change user /execute

2026-07-15 15:45
Admin

Enable Authenticated SMTP for hosted Microsoft accounts

In order for our applications such as Linktivity and Mailmerge4Act to access Microsoft accounts using OAuth authentication, the mailbox needs to have the "Authenticated SMTP" to be enabled. This setting is disabled by default and will need assistance from your Microsoft account administrator in order to enable. Please log in as your Microsoft administrator and follow the steps below in order to enable SMTP authentication:

  1. Open and log in to the Microsoft 365 admin center here: https://admin.microsoft.com/
  2. Once logged in, click on the Users group on the left hand side menu, and press Active Users

2026-07-15 15:48
Admin

&#34;A valid license could not be obtained&#34; error when attemping to activate product

If you receive "A valid license could not be obtained" error when attemping to activate any product, you might need to delete the license files manually from the computer and re-attempt activation. Please follow the steps below:

  • Close the application which is using the product, such as Act or Outlook.
  • Download the reset license script from: https://act4work.com/files/Scripts/ResetLicenses.bat
  • Right click the script, and click Run As Administrator
  • When prompted, enter Y to confirm.
  • When completed, close the script, and re-open the app and attempt activation again.

2026-07-15 15:49
Admin

How to rebuild OleDb views

Some applications require the use of the Act OleDb provider to display or search your Act! data. In some cases, the Oledb views are out of date or missing causing these applications to fail. You can rebuild the applications easily using the steps below. Please note you will need to be a Windows administrator to perform these steps.

  • Press the Windows Start button on the machine where the Act! database resides.
  • In the search bar, type actdiag and press Enter


  • From the menu, press Databases > Database Details List

2026-07-15 15:49
Admin

How to use the Keystroke Sql Login Creator?

Some Keystroke products might require a direct connection to the Act! database using SQL. To allow for this, the Keystroke SQL Login Creator app can be used to create a custom user account, which can be used by the products to access the database. In order to set it up, pleaes follow the steps below:

  1. Log in to the server where the Act! database is located.
  2. Download the Keystroke Sql Login Creator from here
  3. Run the program and press the Find Servers button as shown below:


  4.  Once the search is completed, select your server from the dropdown:


  5.  After selecting your server, click the C

2026-07-15 15:50
Admin

Object reference error when logging in to Act! database

If you receive an "Object reference not set to an instance of an object" error when logging in to the database after confirming the username and password used is correct, it might be due to an issue with the Act! installation. This issue is seen mostly when upgrading an existing installation of Act!. To try and fix this issue, please follow the steps below:

  1. Close and uninstall Act! and any Act! plugins that are showing this error.
  2. Reboot the machine.
  3. Install Act! again and reboot the machine one more time to ensure all Act! libraries are loaded correctly.
  4. Reinstall the Act! plugin and test logging in to the database again to see if the issue is fixed.

2026-07-15 15:51
Admin

Activation is lost once the user logs off from the machine.

If any Act4Work application loses it's activation information after the user logs off from their profile, it is possible that the required registry keys are not preserved due to certain group policies.

In order for the applications to remain activated, the data in the following keys and their subkeys, needs to be preserved:

  • HKEY_CURRENT_USER\Software\Classes\CLSID\
  • HKEY_LOCAL_MACHINE\Software\Classes\CLSID\
  • HKEY_CURRENT_USER\Software\Wow6432Node\Classes\CLSID\
  • HKEY_LOCAL_MACHINE\Software\Wow6432Node\Classes\CLSID\

2026-07-15 15:16
Admin

&#34;Error 1606. Could not access network location Plugins&#34; while attempting to install Act4Outlook

If you receive the error "Error 1606. Could not access network location Plugins" while attempting to install Act4Outlook, it is likely that certain Act! registry keys needed for the installation might be missing or corrupted.


Resolution

  • Please uninstall Act, reboot the computer, and re-install Act!, which should re-create all missing registry keys on the system. 
  • Attempt Act4Outlook installation once again.

2026-07-15 15:45
Admin

&#34;Unable to insert a History&#34; error when sending an email using Act4Outlook

This error can appear when Act4Outlook attempts to record emails to history. Some of the known causes are documented below:

Incorrect Permissions

This error can appear if the  database supplemental files folder of the database is not allowing the current user to save attachments. A quick way to verify if this is a problem is to change your Act4Outlook history settings to simply the "Email subject only" setting and restarting Outlook. If you no longer receive this error, please contact your Act administrator and have them grant the "Everyone" group full access to the database supplemental files folder and any sub folders.

Low Disk Space

This error can appear if the data disk on the machine hosting the database is low on free space. If you are using a remote database, check the free disk space on your machine. If the database is hosted on another machine such as a server, please work with you Act! administrator in order to verify that there is sufficient free disk space available on the server.


SQL Server Limitations

If the machine hosting the database is running SQL Server Express, and the database file size is at or larger than 10GB, Act4Outlook will no longer be able to insert histories to the database as this is a limitation enforced by Microsoft.

To verify the database size, log into the machine hosting the database and press Windows Start button and type actdiag in the searchbar and press Enter. When ActDiag launches, click the menu Databases > Database Details List. Check the Size column of your database to ensure it is lower than 10000 which is  approximately 10 GB. 

2026-07-15 15:46
Admin

Guid2Field

Go to category

How to setup and use Guid2Field?

Guid2Field can be used to easily copy the internal record Id to a user selected field.

  1. After installation, first do a lookup of records you wish to copy the record Id for.
  2. Access the plugin from the menu Tools > GUID2Field
  3. Select the record type you wish to work with on the following prompt:


  4. Select the field you wish to copy the record Id to from the Field Name dropdown, and select whether you wish to work with the current lookup or all record from the Populate the Unique ID for section.

2026-07-15 15:48
Admin

Insurance4Act

Go to category

How do i set up Insurance4Act?

In order to use Insurance4Act, certain fields and custom tables must be created. This will be referred to as the "Schema Import" in this article. This operation can only be performed on the machine hosting the database.

If you are hosting the Act! database on your own machine, please proceed to the schema import section. If your Act! database is hosted on a different computer such as a server, or shared PC, then you will need to perform the initial schema import on that machine instead. If your database is hosted by a third party hosting company, please contact your hosting provider so they can assist you with the import.

Schema Import

  1. After installing Insurance4Act and Tables4Act using the installer provided, please start up Act.
  2. Enter your Insurance4Act and Tables4Act  serial number to activate the products.
  3. Click on the menu Insurance4Act > Setup Insurance4Act


  4. The schema importer will launch. Proceed through the wizard to import the Insurance4Act schema. 

2026-07-15 15:45
Admin

Knowtifier

Go to category

How to retrieve the Act! Web API URL when using Act! Connect Link

If you are trying to connect to an application that requires an Act! Web API URL but you do not possess an SSL certificate, you may use the Act! Connect Link instead. After installing Act! Connect Link on the machine hosting the database, please follow the steps below to retreive the URL

  1. Click Start > All Programs > Act! Connect Link > Act! Connect Link to start the application


  2. Once the Act! Connect Link window is opened, click the Manage link.


  3. Copy the URL from the Endpoint field which is unique to your machine.


  4. Once you copy the Endpoint URL, simply append /act.web.api to the end of the URL to create the Act! Web API URL. For Example,  https://xxxxx.g2c.cloud-elements.com/act.web.api 
  5. You can now enter this URL into the application settings that needs to connect to the Act! database.

2026-07-15 05:11
Admin

Sending Opt-in Request Emails

  1. Click the menu OptinManagerWeb > Email Blasts > Send Emails


  2. For initial testing, it is highly recommended to pick the Selected Contacts option, and sending a test email to your own Contact record. If the tests are successful, you can send emails to multiple Contacts in the database using the other options.

    If you would like to send emails to anyone in the database who has not provided their permission yet, select the Contacts with blank vaues in the "Email Permission" field option.

    If you would like to send emails to Contacts in a group, select the Contacts in a Group option and select a group from the dropdown.

    If you would like to send the emails to all Contacts in the database, select the All Contacts option. 
  3. Press Next to continue.


  4. If selecting Contacts manually, enter the name, email, or company name in the search bar and press Enter to filter your results. Press the > or < buttons to add/remove contacts from your selection. Press Next to continue.


  5. Confirm your selection before proceeding. Press Next to being sending emails.
  6. Once sent, press Finish to close the wizard.


2026-07-15 05:11
Admin

How to migrate Knowtifier Lite settings to the full version of Knowtifier

Once the user upgrades to the full version of Knowtifier, the Knowtifier Lite settings can be migrated easily so the user does not have to reset their email and notice settings from scratch. In order to accomplish this, please follow the instructions below.

  1. Stop the Knowtifier Lite service by clicking the Settings button and clicking the Stop button if available.
  2. Click the Uninstall button to uninstall the Knowtifier Lite service.


  3. Install the full version of Knowtifier. Ensure the Knowtifier program is closed.
  4. Copy the Config.json file from the following folder: C:\Program Files (x86)\ACT\Act for Web\Plugins\MailManager4Act\
  5. Paste this file into the main Knowtifier installation folder at: C:\Program Files (x86)\Act4Work\Knowtifier
  6. Start up Knowtifier and verify if all settings have been migrated successfully.
  7. Once verified, click Settings and click on Install to install the new service, and click Start  to start the service when ready.

2026-07-15 15:46
Admin

How do i set up the Knowtifier?


In this article, we will briely go over setting up the Knowtifier. Before continuing, please ensure you are running Knowtifier while being logged in as a Windows administrator, and have the appropriate read/write access to your Act! database. 

Note For IT Admins: If the database is not hosted on the machine where Knowtifier is installed, please ensure the database is shared with the "Everyone" group with full access. If the network share requires domain authentication, please follow the instructions below to install the Knowtifier service and navigate to the Windows Services list by running services.msc and change the Knowtifier Service to run as a domain user instead of the default Local System.

Installation

  1. Install Knowtifier by running the Knowtifier installer and following the on-screen prompts. If you are upgrading Knowtifier from an older version, you will be prompted to stop the Knowtifier service, in which case, click Yes to continue installation and then manually start the service.
  2. After the installation is complete, start up Knowtifier and enter your license key if needed.  On the main Knowtifier screen, click on the small ellipsis button to browse for your Act! database.

  3. If your Act! database is hosted on your computer, navigate to your Act! database's PAD file and then click open. 
    Note: If your database is hosted on a different machine (e.g. a server), and you are accessing it over the network, please contact your Act! administrator. Your administrator will be able to assist you in determining the correct location of your database. 
  4. Once you have selected the database, type in your Act! username and password and click Log In.
  5. After logging in, you will need to install and start the Knowtifier service. In addition to this, you will need to enter your email credentials so that Knowtifier can send emails on your behalf. The email address entered is what the end user will see when they receive an email from you.
  6. Click on the Email Options button on the main screen of the Knowti

2026-07-15 15:27
Admin

Where do I find the Knowtifier logs?

The Knowtifier App, and Knowtifier Windows service log files are stored separately.

Access the log files from the Knowtifier app

  • Log in to the Knowtifier app.
  • Press the Log Viewer button on the main screen.

2026-07-15 15:28
Admin

Activation is lost once the user logs off from the machine.

If any Act4Work application loses it's activation information after the user logs off from their profile, it is possible that the required registry keys are not preserved due to certain group policies.

In order for the applications to remain activated, the data in the following keys and their subkeys, needs to be preserved:

  • HKEY_CURRENT_USER\Software\Classes\CLSID\
  • HKEY_LOCAL_MACHINE\Software\Classes\CLSID\
  • HKEY_CURRENT_USER\Software\Wow6432Node\Classes\CLSID\
  • HKEY_LOCAL_MACHINE\Software\Wow6432Node\Classes\CLSID\

2026-07-15 05:11
Admin

Creating an Email Notice in Knowtifier

  • From the main Knowtifier screen after logging in, click the Add button.
  • On the Notice Type screen, select the Email Notice  option and press Next.


  • Enable the notice by enabling the Notice Enabled checkbox.
  • Enter a meaningful name in the Notice Name textbox. 
  • Click the Browse button near the Template Path texbox and select your template. If you do not have a template yet, please create one by following the steps documented in the Knowtifier Setup article. Click Next to continue.

2026-07-15 15:45
Admin

Creating Activity Workflow notice in Knowtifier

  • From the main Knowtifier screen after logging in, click the Add button.
  • On the Notice Type screen, select the Activity Workflow  option and press Next.


  • Enable the notice by enabling the Notice Enabled checkbox.
  • Enter a meaningful name in the Notice Name textbox. Click Next to continue.

2026-07-15 15:46
Admin

Creating an Email Report Notice in Knowtifier

  • From the main Knowtifier screen after logging in, click the Add button.
  • On the Notice Type screen, select the Email Report  option and press Next.


  • Enable the notice by enabling the Notice Enabled checkbox.
  • Enter a meaningful name in the Notice Name textbox. Click Next to continue.

2026-07-15 15:47
Admin

Creating an Activity Email Alert in Knowtifier

  • From the main Knowtifier screen after logging in, click the Add button.
  • On the Notice Type screen, select the Activity Email Notice  option and press Next.


  • Enable the notice by enabling the Notice Enabled checkbox.
  • Enter a meaningful name in the Notice Name textbox. 
  • Click the Browse button near the Template Path texbox and select your template. If you do not have a template for your activity notice yet, please create one by following the steps documented in the Knowtifier Setup article. Click Next to continue.

2026-07-15 15:48
Admin

Creating Remote Database Sync notice in Knowtifier

  • From the main Knowtifier screen after logging in, click the Add button.
  • On the Notice Type screen, select the Remote Dataabse Sync Notice  option and press Next.


  • Enable the notice by enabling the Notice Enabled checkbox.
  • Enter a meaningful name in the Notice Name textbox. Click Next to continue.

2026-07-15 15:50
Admin

Creating a Reporting4Act Notice in Knowtifier

  • Before beginning,  please note that Reporting4Act program must not be running when the Knowtifier service runs each to day process these Reporting4Act notices. If your Knowtifier service is set to run after-hours, please ensure you close Reporting4Act at the end of the day so that Knowtifier does not run into any issues when the Reporting4Act notice is triggered.
  • From the main Knowtifier screen after logging in, click the Add button.
  • On the Notice Type screen, select the Reporting4Act Notice  option. If this is the first time you are setting up this notice, click the click to confirm prerequisites link.


  • Since Reporting4Act is installed on a per user basis, Knowtifier service must also run as the user that installed Reporting4Act. Press Yes to enter this user's credentials.

2026-07-15 15:51
Admin

&quot;Invalid column name&quot; error when viewing a custom table list view

If you receive an error similar to "Invalid column name TableName_XXXXID" when viewing a custom table in list view, it will be required to rebuild the database's Oledb views manually. This is due to a defect in Act! versions 25 and older therefore, this error may appear in these versions at a higher frequency especially if new tables or fields are added or updated. To rebuild the oledb views, follow the steps described in this article: https://kb.act4work.com/index.php?solution_id=1094 

2026-07-15 05:11
Admin

ListMax

Go to category

Setting up auto restart Act! Web API

Since the Act! Web API is a 32 bit application, when the process reaches around 2 gigs of RAM, it needs to be restarted. To configure automatic restarts of this process, please follow the steps below:

  1. Open Microsoft IIS
  2. Click Application Pools in the Connections section, and highlight the act.web.api application pool. Once highlighted, click the Advanced Settings link on the right hand side.


  3. Scroll down to the Private Memory Limit (KB) section, and enter 2000000 as the valie and press OK. The Act! Web API process should now be restarted once the process reaches 2 gigs of RAM usage.

2026-07-15 05:11
Admin

Emails messages are not attached to Act! automatically

If Act4Outlook is enabled, activated, fully configured, and Email messages are still not attaching properly to the Act! database, it may be because of one or more of the following conditions.  


Email Address not entered in Act

In order for automatic history recording to work, your email address must be entered in an email field in Act such as E-mail, Personal Email etc. If you have multiple email address that you send from in Outlook, they all must be entered on your Act Contact record. To verify this, please log in to Act! and press the menu Lookup > My Record. Ensure your email addresses are entered in email fields. If not, please enter them, save the record, and try again. Note: The field type of the field in Act! must be E-Mail. Using regular Character fields is not supported

Emails send to Act! users without enabling the Act4Outlook Setting

If you send an email to a Contact that is also an Act! user, emails sent to this Contact will not attach by default.  For example, if you send an email to yourself or a co-worker who also uses Act, the emails will not be attached. If you are sending these emails for the purpose of testing, send the email to another Contact that is not a user. To allow emails sent to users to be attached, follow the steps below:

  1.  Click the Act4Outlook Settings button on the Home tab of Outlook.
  2.  Click the History Recording tab, and enable the Attach emails to Act! database users option. 
  3. Click  Save and Close and restart Outlook.


Restart Outlook

After initial setup, or changing any settings, you must remember to restart Outlook otherwise these settings will not apply and cause issues with history recording. If you are having issues with history recording, simply restart Outlook first and see if that fixes the issue. If not, please continue with the article below.

Incorrect database set in Act4Outlook Settings

Click the Act4Outlook Settings button and ensure the correct database path is set up. If you have recently switched databases, it will be necessary to update the database location in Act4Outlook as well.


Messages not saved to Outlook Sent folder

In order for emails to attach to Act! once the user presses the Send button, the emails must be saved to the Sent Items folder in Outlook. If Outlook settings are set to not save copies of sent items, it could cause issues with Act4Outlook history recording. Please follow the steps below to ensure this option is not enabled.

  • Click File > Account Settings. Open up the Advanced settings of the affected email account.
  • Under the Advanced tab, ensure the Do not save copies of sent items is unchecked.
  • Restart Outlook and send a test email to verify emails are now recorded properly.


Email Account Excluded

If user accidently excluded the email account from automatic history recording, this will prevent emails from being recorded automatically. Please ensure the email is not checked in the Excluded Outlook Accounts section of Act4Outlook settings as shown below: 

2026-07-15 05:11
Admin

Updating Contact Permissions with OptinManagerWeb

  1. Once Opt-in request emails have been sent, you can run use OptinmanagerWeb to download the Contact's choices to your Act! database. It is recommended to run this process at least once a week to ensure your database stays up to date. Once the permissions are downloaded, they are removed from the OptinManagement.com servers.
  2. Click the menu OptinManagerWeb > Update Contacts


  3. OptinManagerWeb will now download the Contact choices and save the values in the Email Permission field for each Contact.

2026-07-15 05:11
Admin

What’s new is Knowtifier version 1.5.4?

Upgrading from Knowtifier 1.4

  • Install the latest version of Knowtifier. Once installed, copy the "config.json" file from the old Knowtifier install location to the new one. In previous versions, the default location of Knowtifier is C:\Knowtifier.  Copy the config.json file to C:\Program Files (x86)\Act4Work\Knowtifier
  • Start up the upgraded Knowtifier,  and log in to the database.
  • Click the "Settings" button, and click "Uninstall" to remove the old Knowtifier service.
  • Once uninstalled, click the "Install" button to use the new Knowtifier service.
  • Click "Start" to start the new service.


Knowtifier New Features

Enhanced Filtering
• Users can now filter records much more easily with the enhanced filter editor.
• Editor can now combine And/Or conditions.
• Editor can now combine filters from different tables such as Contact and Custom Tables.
• Editor can now use brackets to create more complex queries.


Enhanced Notice Management
• Users can now enable or disable selected notices from the main menu easily.


Field Change Triggers
• Knowtifier can now trigger emails based on field changes.
• Fields can be any Contact, Opportunity, or Custom Table fields.
• Knowtifier will check for field changes once every 15 minutes


Activity Notices
• A new notice type of “Activity Notice” is now available which is triggered by activities in the Act! database.
• Users may create customizable templates with the ability to pick from several Activity related fields
• Ability to pick specific users and activity types for notices.
• Trigger email based on activity alarm or a certain time before the activity start time
• Send emails to associated User who the call is scheduled for, Contacts the activity is scheduled with, or all of the above.


Remote Database Sync Notices
• A new notice type of “Remote Database Sync Notice” is now available which is triggered by the last sync dates of the remote databases in the company.
• Users can specify the number of days a RDB can go without syncing and if it does, an automated email can be sent to the email address set in the remote database notice.


Reporting4Act Notices (Requires Reporting4Act to be installed)
• A new notice type of “Reporting4Act Notice” is now available which is triggered similarly to a regular Email Notice. However, instead of sending a templated email, a Reporting4Act report is attached as a PDF to the email and sent to the Contact.
• Once the Reporting4Act reports folder is set, user may pick a report to be sent out to the Contact.


2026-07-15 05:11
Admin

How to setup QSales for Act

In order to use QSales for Act v13, the QSales API needs to  be installed on a server running a Windows Server or Windows Professional operating system which also has local or LAN access to the Quickbooks company file.  In a shared network environment, the QSales API only needs to be installed on this central machine and not on every workstation. The QSales API will communicate with Quickbooks and return data to the Act users running the QSales for Act plugin.

If QSales v13 has not been setup in your environment previously, please first proceed to the Installing the QSales API section first, and then finally, setup and configure the QSales for Act plugin using the links below

Note: Prior to continuing with installation, please ensure your Quickbooks Desktop software is fully up to date. Otherwise,  QSales may potentially have issues connecting with your data file. Once updated, it is also highly recommended to reboot the machine. Once this is done, you may continue with this guide.

2026-07-15 05:11
Admin

Getting Started With ListMax

Requirements:

  • Act! v21 (and higher)
  • Act! Plugin (must be installed to each PC separately)


  1. Since ListMax is an Act! Plugin, Act! needs to be closed during the installation of the application.  To obtain the installation file, visit: https://act4work.com/files/ListMax/ListMax_Installer.exe
  2. After installation of ListMax, re-open Act!.  ListMax will replace the List View that comes standard with the database.
  3. If ListMax doesn't appear, go to Tools, choose Manage Add-ons.  The name of the file is 'Keystroke.ListMax.ActPlugin'.  This must be enabled.
  4. Once successfully installed, there will be a Menu item found under Tools and ListMax.  This is where you can check for updates and show the About page.

Note: ListMax will work with multiple databases but settings/filters are not universal.  When switching to a new database that ListMax has not been configured for, the first pop up that appears will be the 'Column Selector'.  See below for more information on this.

  Opening the Contact List and the List View, you can access ListMax by clicking on this button.


What are the buttons within ListMax and how are they used?  Below will highlight them and give a brief explanation.

 Filters:

Filters are used to save a previous lookup so they do not have to be performed again.  For example ID/Status = Customer AND Record Manager = Chris Huffman.  
The drop down list will display all previously saved Filters.  If no filters are saved, it will read 'None'.  This is also how to remove all filters from a lookup.  Two save buttons are provided.  Save and Save As.
Note: When switching through saved Filters, the column headers will remain the same for all Filters.

Show/Hide:

Group By - Adds a banner for additional grouping.  Eg. Group by Record Manager
Filter Row - Adds a row under the column headers allowing additional filters such as Equals/Contains/Begins with/Greater than/Less than, etc.
Quick Find - Adds a search box to the banner. This searches the entered text in all columns applied. Highlights found text.
Summary Row - Adds a row at the bottom of each column that allows for options such as Sum, Min, Max, Count, etc. Useful for Opportunities.

Lookups:

Clear Filter - Clears all filters applied
Lookup Selected - Performs a lookup for the selected contact(s)
Select All - Highlights all records in the display
Only My Records - Displays only the items connected to the 'My Record' contact.

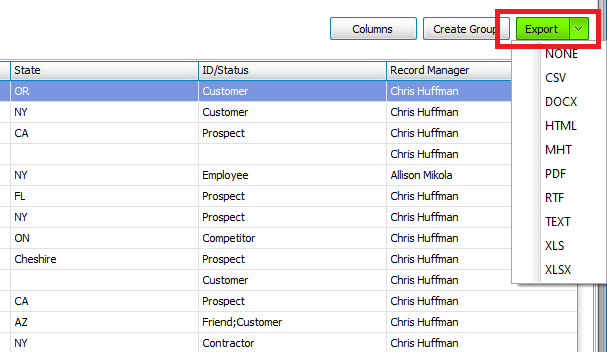
Columns

 Clicking on the Columns button, the image above will appear.  This allows customization of which field headers are displayed.  When toggling through different saved Filters, these column headers will not change.

Create Group:

Based off the filters applied and records displayed, creates a new Act! Group.  Choose between all contacts or selected (highlighted) contacts.  View the newly created Group by opening the Act! Groups along the left panel (or clicking Lookup, Groups and All Groups).

Export:


Take the current list of contacts and Exports them into a custom file type.  Image above shows all available types.


2026-07-15 15:47
Admin

MailManager4Act

Go to category

Verify Email List Using BriteVerify Integration In OptinManagerWeb

  1. Once you have entered your BriteVerify credentials in the OptinManagerWeb Settings, click the menu OptinManagerWeb > Email List Verification > Verify using Briteverify


  2. For initial testing, it is highly recommended to pick the Selected Contacts option, and verifying the email adress of your own Contact record. If the tests are successful, you can verify multiple Contacts in the database using the other options below.

    If you would like to verify the emails of Contacts who have not been verified yet, select the Contacts with blank vaues in the "Email Permission" field option. 

    If you would like to verify Contacts in a group, select the Contacts in a Group option and select a group from the dropdown.

    If you would like to verify the emails of all Contacts in the database, select the All Contacts option.


  3. If selecting Contacts manually, enter the name, email, or company name in the search bar and press Enter to filter your results. Press the or < buttons to add/remove contacts from your selection. Press Next to continue.


  4. Confirm your selection before proceeding. Press Next to being verifying the emails.
  5. Once completed, press Finish to close the wizard.

2026-07-15 05:11
Admin

How to set up MailManager4Act


In order to use MailManager4Act, a custom field and dropdown menu must be created. This operation can only be performed on the machine hosting the database.

If you are hosting the Act! database on your own machine, please install MailManager4Act on your computer and proceed to the Permission Field Setup section below. If your Act! database is hosted on a different computer such as a server, or shared PC, then you will need to perform the Permission Field Setup on a machine that has direct access to this server. If your database is hosted by a third party hosting company and you are using a remote database, please contact your hosting provider so they can assist you with the initial set up. Once the steps in the Permission Field Setup section have been performed, you may move on to the Configuration section below.

Note: Please create a backup of your database prior to begining with the initial setup section. If you previously had MailMerge4Act, or OptinManager installed, please uninstall them prior to the install in order to avoid any conflict issues.


Permission Field Setup

  • Install MailManager4Act on a workstation machine that has direct access to the server hosting the database.
  • After logging in to Act!, you will be presented with the MailManager4Act activation window. Enter your license key and click the Add button to add your Act user to the licensed users list. Otherwise, simply close this window to continue in trial mode.
  •  Click the menu MailManager4Act > MailManager4Act Settings
  • You can either create a new permission field by clicking the Create Permission Field button, or if you already have a character field in the database that you have used previously to record Contact permissions, select this existing field from the Field Name dropdown menu. In the Value field, type in the value that MailManager4Act will use to ignore Contacts from email blast. If you clicked the Create Permission Field button, by default this value will be “Denied”

2026-07-15 15:47
Admin

Creating/Editing Templates in MailManager4Act

  • You can access the template editor by clicking the menu Write > MailManager4Act > Create/Edit Templates

2026-07-15 15:50
Admin

Convert native Act! Templates to MailManager4Act Templates

  • If you have one or more existing templates in the native Act! template format, you can easily convert these to the new MailManager4Act format using the template converted. Note : the feature below requires Microsoft Word 2010 or higher in order to function.
  • Click the menu Write > MailManager4Act > Convert Native Templates

2026-07-15 15:50
Admin

Sending Opt-in emails to Contacts with MailManager4Act

  • Prior to sending the emails, perform a lookup of Contacts that you wish to send the emails to. In order to test this function, we recommend looking up your own Contact record by clicking the menu Lookup > My Record
  • Click the menu MailManager4Act > Optin Management > Send Emails
  • In the following window, enter the Email Subject, Hyperlink Text, and Closing Text. A sample for these values is included in the screenshot below. Once satisfied, click the Refresh Preview button to preview your changes.

2026-07-15 15:52
Admin

Generate the Opt-in link manually without sending email from template in MailManager4Act

  • Using the menu option MailManager4Act > Optin Management > Send Emails command, your Contacts will be sent a unique link which they can use to submit their Opt-in/Opt-out requests. If for some reason, you wish to generate a link for the Contact without sending them an email using the process above, click the menu MailManager4Act > Optin Management > Generate Unique Link 
  • This will copy the unique link to your clipboard for the current Contact that is in your detail view. 
  • You can now paste this link in a separate email and send it to your Contact directly. This feature is useful if there was an issue with the original Opt-in email and the Contact was unable to submit their request.

2026-07-15 05:38
Admin

Updating Contact Opt-in permissions in the database

Once you have sent your Contacts an Opt-in request email, you can download their choices by clicking the menu MailManager4Act > Optin Management > Update Contact Permissions We recommend running this command at least once a week in order to update your database so that all Contact permissions are downloaded. For security reasons, these submissions will be removed from our server once they are downloaded on your database. The Email Permission field will be set to Accepted or Denied based on the Contact's choice. Moreover, a History record will also be generated which will record the Contact's choice.

2026-07-15 06:10
Admin

Merge template to Word in MailManager4Act

  • Perform a lookup of Contacts that you wish to send the letter to
  • Click the menu Write > MailManager4Act > Merge to Word
  • Select a template file and hit Open
  • In the Contact selection screen, select which Contacts will be processed by MailManagfer4Act. If you already have a Group set up in Act with the required Contacts, click Group and select the Group name from the dropdown menu.
  • In the Save Word document to field, browse to a location where the document will be saved to and click Next

2026-07-15 15:17
Admin

Merge template to E-mail in MailManager4Act

  • Perform a lookup of Contacts that you wish to send the letter to
  • Click the menu Write > MailManager4Act > Merge to Email
  • Select a template file and hit Open
  • In the Contact selection screen, select which Contacts will be processed by MailManagfer4Act. If you already have a Group set up in Act with the required Contacts, click Group and select the Group name from the dropdown menu.
  • In the Save Word document to field, browse to a location where the document will be saved to and click Next

2026-07-15 15:18
Admin

Edit/Delete scheduled email blast in MailManager4Act

  • Once you schedule an email blast using the Send Later option in the Merge To Email wizard, you can edit or delete this email blast by clicking the menu MailManager4Act  > Edit Scheduled Emai Blast
  • From the window below, click the Delete button if you wish to delete the email blast.
  • If you wish to edit this email blast, click the Edit button.
    Note: If you are editing an existing email blast that uses either the Current Contact  or Current Lookup settings, please remember to re-create your Contact lookup. Otherwise, the email blast will be scheduled for your current lookup at the time, which may be incorrect. 

2026-07-15 15:19
Admin

Managing bounced emails with MailManager4Act

MailManager4Act provides a few different ways to process email addresses that have bounced. You can either provided a list of email addresess, or have MailManager4Act monitor an IMAP folder in your email account and try to find bounced email messages. Once you have this list, MailManager4Act can do a lookup of these Contacts. You can then either edit/delete these Contacts, or reach out to them via phone of other means to get the correct contact information.


Looking up email address list

  • Click the menu MailManager4Act > Manage Bounced Emails  > Lookup email address list
  • In the textbox, enter email addresses you wish to lookup (one per line). 
  • Click the Lookup button to start searching the Contacts in your database. 
  • Once completed, MailManager4Act will perform a lookup of these Contacts and switch to the list view. You can then manipulate this list as you wish


Monitoring an IMAP folder

  • MailManager4Act can also log into your email server using IMAP and monitor a folder for any unread messages that have bounced. We recommend moving any bounced email messages to  a custom folder and marking them as unread before continuing.
  • Make sure your IMAP server information is entered in the MailManager4Act Sett

2026-07-15 15:20
Admin

Download webform submissions

  • In order to download the webform submissions to the database, click the menu MailManager4Act > Webforms > Download webform submissions
  • MailManager4Act will download all webform submissions and Create/Update Contacts as specified in the MailManager4Act Webform Settings
  • We recommend running this command at least once a week in order to update your database so that all webform submissions are downloaded promptly. For security reasons, these submissions will be removed from our server once they are downloaded on your database
  • A history record will be generated each time a submissions is downloaded and any field changes will be recorded with the old and new values.

2026-07-15 15:21
Admin

Sending email from stationery settings

  • Click the menu Write > MailManager4Act > Email from Stationery

2026-07-15 15:23
Admin

Optin Manager

Go to category

How do I set up Optin Manager?


In order to use Optin Manager, a custom field and dropdown menu must be created. This operation can only be performed on the machine hosting the database.

If you are hosting the Act! database on your own machine, please install Optin Manager on your computer and proceed to the Initial Setup section below. If your Act! database is hosted on a different computer such as a server, or shared PC, then you will need to perform the Initial Setup on a machine that has direct access to this server. If your database is hosted by a third party hosting company and you are using a remote database, please contact your hosting provider so they can assist you with the initial set up. Once the steps in the Initial Setup section have been performed, you may move on to the Configuration section.

Note: Please create a backup of your database prior to begining with the initial setup section.

Initial Setup

  • Install Optin Manager on a workstation machine that has direct access to the server hosting the database.
  • After logging in to Act!, you will be presented with the Optin Manager activation window. Enter your license key and click the Add button to add your Act user to the licensed users list.
  • If logged in as an Administrator, you will be prompted to create a custom field. Click Yes to lock the database and create the field automatically. If you already have a character field in the database that you have used previously to record Contact permissions, click No and select this existing field as described below in the article.


  • Once the field is created, please add the "Contact Permission" field to your Contact layout. To learn more about adding fields to your layout, please refer to the following article: Article ID: 1011

Configuration and Sending Emails

  • Once logged in to the database, create a lookup of Contacts whom you wish to send the contact permission email to.
  • Click the menu Optin Manager > Optin Manager Settings

2026-07-15 15:26
Admin

OptinManagerWeb

Go to category

How to setup OptinManagerWeb


In order to use Optin Manager, a custom field and dropdown menu must be created. In addition, you will need access to the main database using the Act Web API. This Act Web API URL must also support https. If you do not possess an SSL certificate to support https, or if you do not want to directly open ports on your firewall to allow web access to your server, you may use Act Connect Link instead. See the following article which explains how to get the Act Web API URL using Act Connect Link: Article ID 1066

If your database is hosted in the cloud, your Act Hosting provider can provider can provide you with the Act Web API URL.

Note: Please create a backup of your database prior to begining with the initial setup section.

Initial Setup

  • Install and activate OptinManagerWeb on a workstation.
  • Click the Act! API Settings menu


  • Enter your Act Web API URL, Database name, username and password. Click Login to ensure you are able to connect successfully. Click Save to save your settings.

2026-07-15 15:27
Admin

Primary Contact Tool

Go to category

How do i set up the Primary Contact Tool?

In order to use the Primary Contact Tool, a custom Yes/No field called "Primary Contact" must be created. This operation can only be performed on the machine hosting the database.

If you are hosting the Act! database on your own machine, please install the Primary Contact Tool on your computer and proceed to the Initial Setup section below. If your Act! database is hosted on a different computer such as a server, or shared PC, then you will need to perform the Initial Setup on that machine instead. If your database is hosted by a third party hosting company, please contact your hosting provider so they can assist you with the import. Once the steps in the Initial Setup section have been performed, you may move on to the Configuration section.

Note: Please create a backup of your database prior to begining with the initial setup section.

Initial Setup

  • Install the Primary Contact Tool on the machine hosting the database and log in.
  • After logging in, you will be presented with the Primary Contact Tool activation window. Enter your license key, or press Close to continue in trial mode.
  • If logged in as an Administrator, you will be prompted to create a custom field. Click Yes to lock the database and create the field automatically.


  • Once the field is created, please add the "Primary Contact" field to your Contact layout. To learn more about adding fields to your layout, please refer to the following article: Article ID: 1011

Customizing Settings

  • After installation of Primary Contact Tool, log into the Act database and click Tools > Primary Contact Plus Settings in order to access the settings dialog.
  • If you wish to copy the primary Contact’s record manager to all other contacts in the company, check the option in the General Settings section.
  • If you wish to exclude certain custom tables from the reassign process of custom table records, check off the table names in the Custom Table Settings section. If the user chooses to reassign custom table records, records from these selected tables will not be modified. 

  Using Primary Contact Tool

  • Navigate to a Contact that should be made primary contact for a company.
  • Click the Make Primary Contact button on the toolbar.
  • If the Contact has a Company name entered, the tool will look up and link the company with a matching name. If no matches are found, a new company will be created and linked.
  • Click Yes on the following prompt to reassign custom table records (if any), or No to ignore reassigning of custom table records.

2026-07-15 15:17
Admin

QSales for Act

Go to category

Installing the QSales API

In order to use QSales for Act v13, the QSales API needs to  be installed on a server running a Windows Server or Windows Professional operating system which also has local or LAN access to the Quickbooks company file.  In a shared network environment, the QSales API only needs to be installed on this central machine and not on every workstation. The QSales API will communicate with Quickbooks and return data to the Act users running the QSales for Act plugin. 

Note: Prior to setting up the QSales API, please understand that you must first create a dedicated Quickbooks user for QSales API. This user must have the appropriate permissions which allow for QSales to create and edit records such as transactions and customers. Once QSales API is installed and this particular user is assigned, no one will be able to log in to this Quickbooks user while the QSales API is running.

Installing QSales API

  1. Before beginning installation, log in to Windows using a user account that QSales API will use to communicate with Quickbooks. This user must be a local Windows Administrator, and also have access to launch and log into Quickbooks.
  2. Download and install the QSales for Act Server installer from the following link: https://act4work.com/Files/QSalesForAct/64bit/QSalesForAct_Server_Installer.exe
  3. Launch the QSales API Utility from the Windows Start menu.

2026-07-15 15:44
Admin

Configuring the QSales for Act plugin

Note: Prior to configuration of QSales for Act plugin, please ensure you have setup the QSales API and you have the QSales API Url and Password. Please see this article: https://kb.act4work.com/index.php?solution_id=1085


Setting Up QSales for Act plugin

  1. After installing QSales for Act, launch Act and log in to Act as an Administrator. Enter your serial number to activate or run the program in trial mode.
  2. When launching QSales for Act v13 for the first time, you will see the QSales for Act Install Wizard. If for some reason you do not see this prompt, you can access the installer from the menu item Tools > QSales for Act Install Wizard.
  3. If you had QSales v12 or older, select the Existing Act! database radio button. Otherwise, select the New Act! database option.
  4. On the Web API Settings and Permissions screen, press the Configure QSales Admin Settings button.
  5. Enter your QSales API Url and passowrd you set up while installing the QSales API. In the User permissions section, press Edit to change permissions for any of your Act users. By default, all users have readonly permissions. Press Save when done.

2026-07-15 15:46
Admin

Server vs. Personal API deployment

QSales for Act Api can be deployed in either Server or Personal mode as shown above. The article below describes the differences between these two options.

Server

The use of Server mode is preferred, as it allows for the least manual intervention by the user/administrator of the Act database. The server deployment will install the QSales for Act API as an always running Microsoft IIS web application. This means, when the machine is rebooted, the API will launch it's own instance of Quickbooks in the background as soon as it starts receiving requests. However, this option requires that a dedicated Quickbooks license be assigned to a Quickbooks user. The API will use this license to log in to Quickbooks and provide access to QSales for Act clients. If this is not possible due to cost concerns, a more affordable option is to use Personal deployment type, which is explained below.

Personal

The use of Personal mode is preferred when you cannot assign a dedicated license for the QSales API user. In this case, the personal deployment type will use the currently logged in Quickbooks user's connection and share it out and make it available for QSales for Act clients. 

It also means that Microsoft IIS is not used, and the connection is not "always running" as with the server couterpart. After installing the API using this deployment type, a small QSales API Application is started on system startup as shown below:

2026-07-15 15:46
Admin

Quoting4Act

Go to category

How do i set up Quoting4Act?

This program has gone through a few iterations since it was originally developed. In 2019 it was rewritten to remove the requirement for custom tables to track the quote details, which simplified the requirements and reduced the cost for the users.
The important thing to understand from a user perspective is this is a quote renderer. It takes the products & services from an Opportunity and converts it into a Quote that we can make some adjustments to through the quoting console.
This is different from some popular quoting programs that a quote inside of its application and then creates the opportunity in Act!. This goes in the opposite direction, creating the quote from the Opportunity.
Setup Process
1. close Act!
2. install software
3. Launch Act! and register the software or the trial
Once you're back into Act!, go into the Opportunity section and select the Detail View of any product to check that the Quoting4act label is there beside the layout selector.

2026-07-15 15:20
Admin

How to setup Quoting4ActWeb

Note: Before proceeding, please complete the Schema Import section of the Quoting4Act (Windows) article available here: http://kb.act4work.com/index.php?solution_id=1025


 Setting Quote Preferences

  1. Navigate to any existing or new Opportunity, and click on the Quoting4Act menu and click Opportunity Quote


  2. Once the Quoting4ActWeb window appears, click the Document Settings option.

2026-07-15 15:21
Admin

Tables4Act

Go to category

Cannot deserialize the current JSON array ... error when refreshing table

If you receive and error "Cannot deserialize the current JSON array ... " similar to the one below when attempting  to load of refresh a custom table, it is likely that the column preferences have become corrupted for that table. In order to reset the column preferences, please follow the steps below.

2026-07-15 15:26
Admin

Creating a Custom Table

  • Click Custom Tables > Manage Custom Tables.

2026-07-15 15:27
Admin

How to remove Keystroke Tables manually

In some cases, installing/uninstalling Keystroke Tables does not update or delete files from the Act program folder. This could cause problems with the program and this article covers how you can remove all these files manually so that it can be installed from scratch. Please follow the steps below to remove these files manually.

  • Close Act and uninstall Tables4Act or Keystroke Tables from the Control Panel if present.
  • Navigate to the Act program files folder.  Please see table below for its location

    Act Edition Location
    Act Premium/Pro (v23 or older) C:\Program Files (x86)\ACT\Act for Windows
    Act Premium Web (v23 or older) C:\Program Files (x86)\ACT\Act for Web
    Act Premium/Pro (v24 or newer) C:\Program Files\ACT\Act for Windows
    Act Premium Web (v24 or older) C:\Program Files\ACT\Act for Web
  • Once navigated to the appropriate Act folder above, open the Plugins folder.
  • Delete the folder Tables4Act
  • Navigate back to the Act folder and open the Tools folder.
  • Find and delete all files starting with the word Tables4Act
  • Reinstall Keystroke Tables and test.

2026-07-15 15:28
Admin

Tabs4Act

Go to category

How do i set up Tabs4Act?

  • After installation, open the layout editor by clicking Tools > Design Layouts.
  • To display Tabs4Act control, right click anywhere in the toolbox on the leftside of the Layout editor, and click Customize.
  • From the Customize Toolbox list, select Tabs4ActCustomTab, and click OK.
  • You should now see a new section in the toolbox called “Custom”. Click the Custom section to expand.
  • Click on Tabs4ActCustomTab and drag it on the layout
  • While having the Tabs4Act control selected, press the F4 key on the keyboard to open the properties window. 
  • Under the Behavior section, navigate to the TabPages property, and click the ellipsis button to open the Tab page properties.
  • To rename existing tabs, highlight the tab from the Members list, and change its “Text” property.
  • To Add or Delete tabs, click the Add or Remove buttons respectively.
  • Once finished customizing, click OK to return to the layout editor.
  • You may now place Act fields in any of the new tabs.

2026-07-15 15:19
Admin